Hero
Welcome to our Hero class guide hub for the game MapleStory!
This site aims to compile comprehensive knowledge into an easy-to-follow resource for both min-max enthusiasts and trainers seeking quick tips.
FAQ & Acronyms
Frequently Asked Questions
Q: Where do I train?
Check the Hero Discord (link at the very bottom of this page (footer)) to find specific map rotations for each specific zones!Q: What's stronger between Axe and Sword?
Axe. Axe has an additional +5% damage. This is just damage, not final damage.Q: Do I go 1-handed or 2-handed?
2-handed.Q: Do I need to job change in order to liberate the Genesis weapon?
No.Q: Will I lose my 6th job progression if I job switch from Hero to a Paladin/Dark Knight or the other way around?
Yes, you will lose all progression besides unused Sol Erda and Sol Erda fragments.Q: How much IED do I need?
Try to obtain as much IED as possible without sacrificing other stats such as %Boss DMG or %Attack. Ideally your WSE and familiars won't have any %IED, but it's alright temporarily to reach specific IED thresholds.
● Suggested IED for CRA bosses and below: 90%+.
● Suggested IED for every boss between CRA and Hard Lotus/Damien: 93%+.
● Suggested IED for Hard Lotus/Damien and above: 96%+.
Calculate your total IED here: https://gmsmeta.com/apps/ied.html#Q: Is Hero negatively affected by high ping?
Yes, high ping can sometimes reduce the effectiveness of Instinctual Combo. Generally, high ping can make it difficult to time or react to bossing mechanics. If you're experiencing high ping (100ms+), you might consider optimizing your connection. Some players find that ExitLag can help reduce ping, just make sure to select the closest server (e.g., Oregon for GMS NA servers).NOTE: While ExitLag is generally allowed, always follow the game's Terms of Service. For example, using ExitLag to bypass the regional country block restriction is prohibited and could result in penalties.You can use our referral link to ExitLag by clicking the LINK HERE or the image below for a FREE 3-DAY TRIAL AND 50% OFF by using code ZELPEX.

Q: I don't see "Enter Text Here" in the guide but I have a question about it!
You can always join our Discord for more details/information about Hero.Q: I want to see "Enter Text Here" added to the guide, or, I want to see "Enter Text Here" changed in the guide!
You can always join our Discord to suggest changes to the guide.
Acronyms & Abbreviations
| Acronym | Description |
|---|---|
| 1H | One-Handed |
| 2H | Two-Handed |
| AB | Angelic Buster (Link Skill) |
| AS | Attack Speed |
| BB | Beam Blade |
| BiS/BIS | "Best in Slot" |
| Blitz | Blitz Shield |
| BSB | Burning Soul Blade |
| CD | Cooldown |
| CV | Cry Valhalla |
| DAB | Decent Advanced Blessing |
| DCO | Decent Combat Orders |
| DHS | Decent Holy Symbol |
| DSE | Decent Sharp Eyes |
| DSI | Decent Speed Infusion |
| FA | Final Attack |
| FD | Final Damage |
| IC | Instinctual Combo |
| IED | Ignore Enemy Defense |
| IS | Impenetrable Skin |
| RB | Raging Blow |
| RE | Rending Edge |
| RR | Rising Rage |
| SC | Spirit Calibur |
| SI | Sword Illusion |
| WA | Weapon Aura |
| WR | Worldreaver |
| WSE | Weapon, Secondary, Emblem |
Weapon Type
Axe vs. Sword

Axe advantages:
5% damage (additive damage %, not final damage).

Sword advantages:
Job changing flexibility with Paladin.
Matching aesthetics with the class’s skills.Conclusion:
● Choose Axe if you will never play Paladin and want to maximize damage on Hero.
● Choose Sword if you don’t care about the 5% damage and prefer the matching aesthetics.
● Choose Sword if you want the ability to switch between Hero and Paladin.
Guide Note: Keep in mind that after you’ve reached 6th job and want to job switch, you will lose ALL your invested resources in the 6th job system (i.e. you will not maintain HEXA Levels). This is why we suggest going for the Axe because you’ll most likely never want to swap to Paladin anymore because of this.
One-handed (1H) vs. Two-handed (2H)
The choice between using a 1H weapon and a 2H weapon is pretty simple since the announcement of the Astra Secondary.
2H always wins since the secondary type is the same and you're able to achieve Attack Speed 10 on both 1H and 2H quite easily.The Weapon Multiplier
Every weapon type in MapleStory has a hidden multiplier that applies to your total Weapon Attack from all sources (gear, buffs, potentials, etc.).
This is the main reason 2H weapons win.For Warrior classes (specifically Hero), the multipliers are:● 1H Sword / 1H Axe: 1.34x
● 2H Sword / 2H Axe: 1.44xBecause this multiplier affects your entire pool of Weapon Attack, the gap is massive. Dividing 1.44 by 1.34 results in roughly a 7.5% Final Damage increase just for holding a 2H weapon.
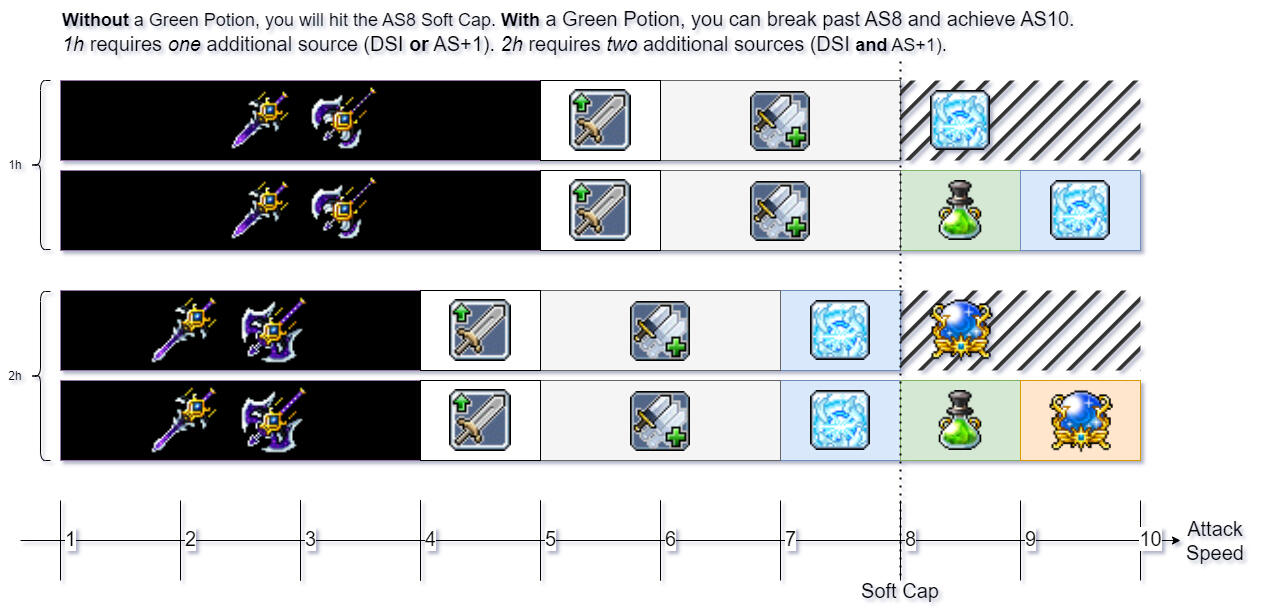
Max Attack Speed on 1H and 2H
In GMS, we have the benefit of 10 attack speed cap (hard cap) compared to KMS’s 8 attack speed cap (soft cap).
This site explains how much faster the skills can become with you having attack speed 10 in terms of the delay before you're able to cast another skill.
https://masonym.dev/action-delays
(this site explains it a bit differently in terms of the number, attack speed 8 = 2 and attack speed 10 = 0, this is the old way people used to say it before.)IMPORTANT NOTE: In order to break the soft AS cap, you HAVE to use a Monster Park Extreme Green Potion. Without the potion, even a 9 AS will function at the 8 AS soft cap. There are a few exceptions to this case, such as Kanna's Domain, but these are not reliable methods to list them all here.As a Hero, hard cap can be achieved with:A 2H weapon has an average (stage 4) attack speed (AS):
● Weapon Booster (+2 AS).
● Weapon Mastery (+1 AS).
● Decent Speed Infusion (+1 AS).
● Monster Park Extreme Green Potion (+1 AS).
● Inner Ability (+1 AS).A 1H weapon has a fast (stage 5) attack speed (AS):
● Weapon Booster (+2 AS).
● Weapon Mastery (+1 AS).
● Monster Park Extreme Green Potion (+1 AS and allows you to break the attack speed cap).
● Decent Speed Infusion (+1 AS).See the picture below to get a better visual understanding of how to achieve 10 AS.
Pet Skill Setup
Pet Skill Buff Setup
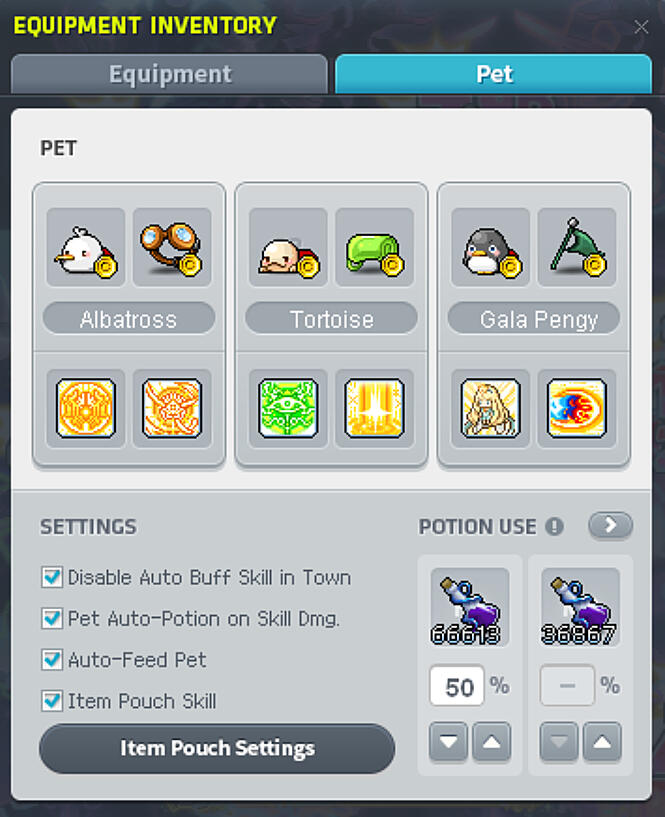
| Pet # | Slot # | Skill Name |
|---|---|---|
| Pet 1 | Slot 1 | Scarring Sword |
| Pet 1 | Slot 2 | Decent Combat Orders |
| Pet 2 | Slot 1 | Decent Sharp Eyes |
| Pet 2 | Slot 2 | Spirit Blade |
| Pet 3 | Slot 1 | Decent Holy Symbol |
| Pet 3 | Slot 2 | Weapon Aura |
Guide Note: As of GMS v267, Weapon Aura can be auto-buffed with 100% uptime, make sure you use this on your pet!
Familiar Badges
Recommended Badge Setup
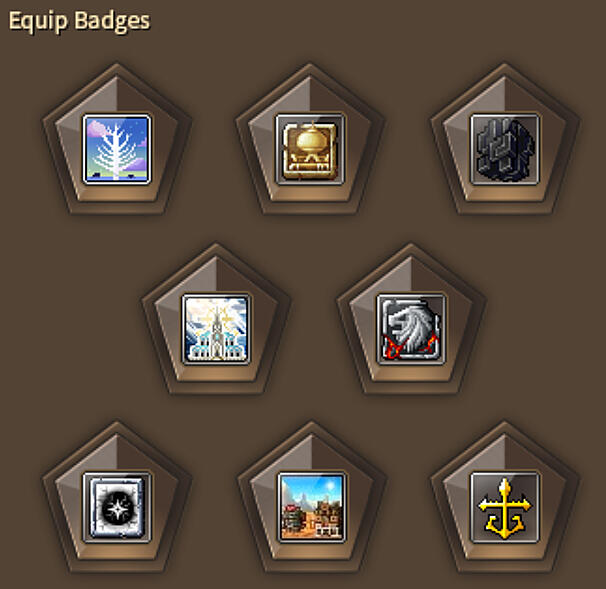
The following badges are listed in the order shown on the image above.#1: Ocean Badge = Critical Rate +1%, Damage +1%
#2A: Researcher Badge = Damage +1%, Max HP +1%
#2B: Sandy Badge = Damage +1%, DEF +5%
#3: Labyrinth Badge = All Stat +1%, Damage +1%
#4: Holy Badge = ATT +1%, Critical Rate +1%
#5: Lion Badge = ATT +1%, Max HP +1%
#6: Apocalypse Badge = ATT +1%, ATT +2
#7A: Time Badge = 3% Chance to Recover 20HP when attacking, IED +3%, or;
#7B: Wasteland Badge = M.ATT +1%, IED +3%
#7C: Mineral Badge = DEF +5, IED +3%
#8A: Rebel Badge = Critical Rate +1%
#8B: Commerci Badge = DEF +2%Critical Rate +1%
GUIDE NOTE: There is a maximum number of lines that can be equipped at the same time. Exact values can be found here, but generally only three lines of the same stat can be equipped at the same time. If additional stats are listed in red on the right side of the UI, under "Badge Effects", they are not being counted.
Oz Rings
General Note
Generalized Bossing Guide – Oz Rings
The following recommendations on this page are based on generalized bossing scenarios. Actual performance may vary depending on individual playstyle, boss mechanics, and party composition. For optimal results, we recommend conducting a Battle Analysis (BA) to determine the best setup for your specific needs.When obtaining a grindstone your primary upgrade target is to upgrade your ROR4 to a ROR5, and your ROR5 to a ROR6. Once you have a ROR5 then aim for WJS5 > CONT5 > TOTALING5 > RISKTAKER5 (same route for level 6 as prio).
Only ROR3/4/5/6 Fans

Following the GMS v263 patch, Oz rings were updated to have a 120s cooldown; this matches our burst timing exactly.Ring of Restraint should be used for regular and origin bursts.
If You "Only" Have A WJ3/4/5/6

Following the GMS v263 patch, Oz rings were updated to have a 120s cooldown; this matches our burst timing exactly.If you only have a WJ ring, you should use it for your regular and origin bursts. Swapping to a damage ring between bursts is not recommended.
If You "Only" Have A CONT3/4/5/6

If CONT is the only Oz ring in your possession, keep it equipped always.When using the CONT ring, try to time your attacks, such as SI+HEXA BB+HEXA RR and when you're actually bursting, in the windows where the CONT buff activates.
If You Have Multiple Rings
Once you begin obtaining Oz rings, it's recommended to keep a copy of each of the important rings: Restraint, Weapon Jump, Continuous, Totaling and Risk Taker.
You do not need to keep multiple levels (i.e. if you have a WJ3 and obtain a WJ4, you can get rid of the WJ3).CONT should be useful for culvert rotations and possibly dojo. WJ is useful for the 60 second mini-burst.
Totaling and Risk Taker may be useful in min/max scenarios such as Risk Taker in Limbo due to easily being able to dodge him and Totaling and/or Risk Taker for Destiny liberation missions to min-cut the boss.

Since you have multiple rings now you are able to make use of the Swap Ring skill after you equipped both rings, this skill allows you to swap two rings and you can find this skill in your beginner skill tab, you'll both have them equipped and can swap between them with this skill.The meta setup these days is:
● Main ring for 2 minute burst: ROR
● Second ring for 60 second mini-burst: WJMake sure you use this skill outside of your burst and mini-burst buffs and be sure to use the skill as soon as you're able to since there is a small cooldown after you use this skill until you can actually use your OZ ring.
Link Skills
Bossing Link Skill Setup
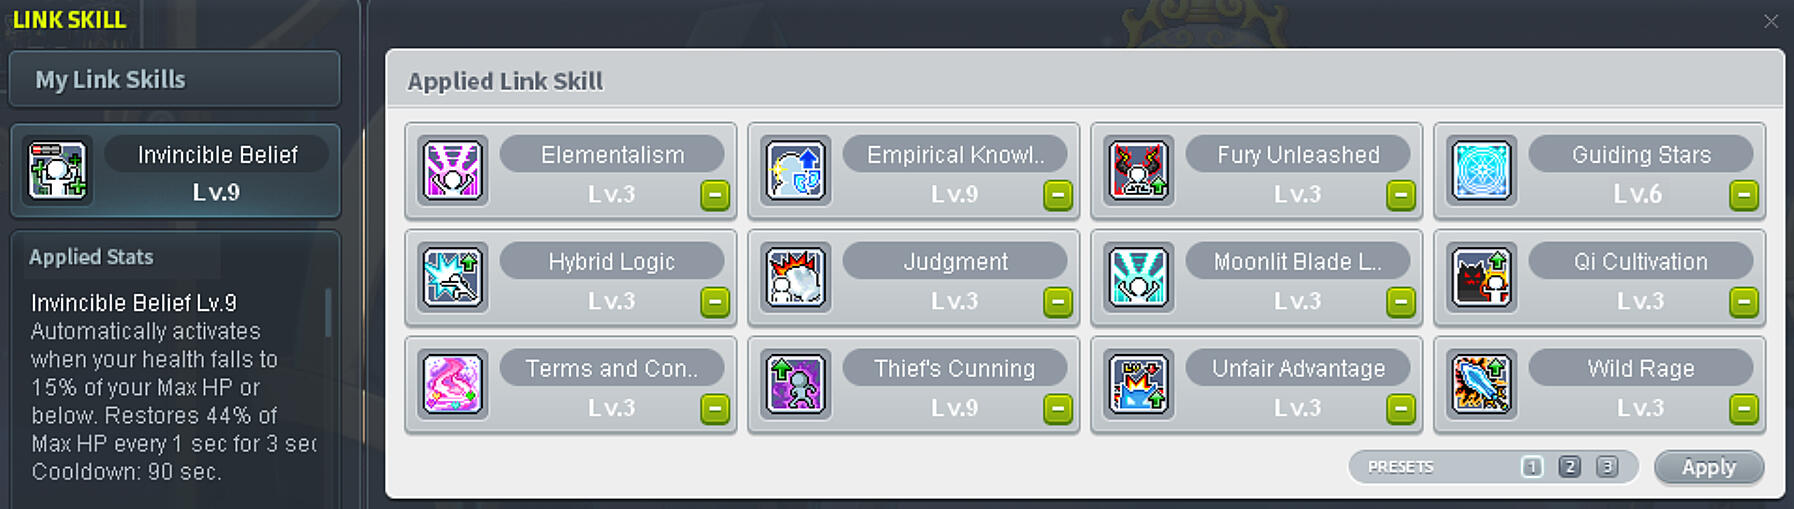

Slot 0: Invincible Belief
Requires: 3 x Explorer Warriors (210)
Level 9: Automatically activates when your health falls to 15% HP or below. Restores 44% HP every 1 seconds for 3 seconds. Cooldown: 90 seconds.
Damage +6%

Slot 1: Elementalism
Requires: Kanna (210)
Level 3: Activate an attack skill 40 times to meet the conditions.
Damage: +20%.
Duration: 12 seconds.

Slot 2: Empirical Knowledge
Requires: 3 x Explorer Mages (210)
Level 9: Damage +9%, IED +9%.(When attacking, skill has a 31% chance to apply a debuff that lasts for 10 seconds, stacking up to 3 times. Damage per stack: +5%, IED per stack: +5%).

Slot 3: Fury Unleashed
Requires: Demon Slayer (210)
Level 3: Boss damage +20%.

Slot 4: Guiding Star
Requires: 2x Shine classes (210)
Level 6: +19% Buff Duration, Critical Damage +6%.

Slot 4: Hybrid Logic
Requires: Xenon (210)
Level 3: All Stats +15%.

Slot 5: Judgment
Requires: Kinesis (210)
Level 3: Critical Damage +6%.

Slot 6: Moonlight Blade Learnings
Requires: Hayato (210)
Level 3: If Critical Rate: 100+% and Critical Damage: 50+% then you gain Critical Damage: +7%.

Slot 7: Qi Cultivation
Requires: Mo Xuan (210)
Level 3: Boss Damage +16%(Boss Damage increased by +4%. If target is a boss, each successful attack adds +2% Boss Damage, stacking 6 times, and stacks are activated every 2 seconds. Duration 5 seconds.)

Slot 9: Terms and Conditions
Requires: Angelic Buster (210)
Level 3: Provides an active buff skill. On use, damage +120% for 10s (duration is affected by buff duration and server lag). Cooldown: 60 seconds.

Slot 10: Thief’s Cunning
Requires: 3 x Explorer Thief (210)
Level 9: Upon debuffing an enemy, damage: +27%. Duration: 10 seconds (affected by server lag). Cooldown: 20 seconds.)

Slot 11: Unfair Advantage
Requires: Cadena (210)
Level 3: Damage +9% when target is <= your level, damage +9% when target is affected by a debuff.

Slot 12: Wild Rage
Requires: Demon Avenger (210)
Level 3: Damage +15%
Guide Note: the following link skills are some additional options that may help you out, or provide better damage depending on your character. Using Luminous will likely depend on your own personal IED%. Recommend using MapleScouter or other similar calculators if you are looking for the best choice for your situation. In general, we think that all link skills shown above beat the ones below, marginally.

Optional: Spirit of Freedom
Requires: 4 x Resistance (210)
Level 12: 12 seconds invincibility after being revived.This skill should only be used when you have survivability issues.
(Exchange with Slot 4: Hybrid Logic).

Optional: Light Wash
Requires: Luminous (210)
Level 3: IED +20%.If you have under 90% IED.
(Exchange with Slot 4: Hybrid Logic).

Optional: Spirit Guide Blessing
Requires: Lynn (210)
Boss Damage: +11%
Critical Rate: +10%
Max HP +5%
Max MP: +5%If you're having issues with getting 100% crit.
(Exchange with Slot 4: Hybrid Logic).
Mobbing Link Skill Setup
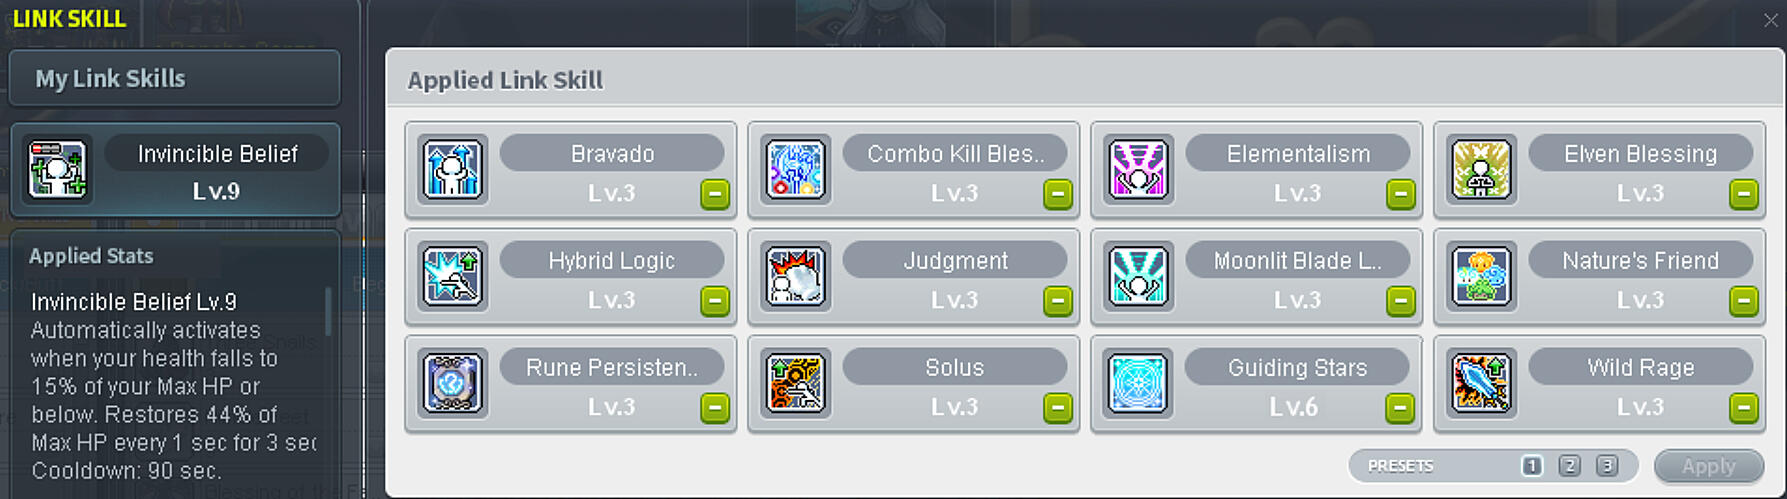
Guide Note: duplicate link skills, as shown in the screenshot above, have been detailed in the previous section and will not be repeated here.
The 2 skills you should aim for ASAP to level 3 are Elven Blessing and Rune Presistence, these impact your grinding rates the most!

Slot 1: Bravado
Requires: Hoyoung (210)
Level 2: Enemy DEF Ignored: +10%, Damage +14% against enemies with 100% HP.

Slot 2: Combo Kill Blessing
Requires: Aran (210)
Level 3: Combo Kill Marble EXP: +900%

Slot 4: Elven Blessing
Requires: Mercedes (210)
Level 3: EXP +20%.

Slot 8: Nature’s Friend
Requires: Lara (210)
Level 3: Damage: +7%, Activate nature's help upon defeating 20 normal monsters. Damage Against Normal Monsters by +15% for 30 seconds when nature's help is active. Cooldown: 30 sec.

Slot 9: Rune Persistence
Requires: Evan (210)
Level 3: Rune Duration +70%.

Slot 10: Solus
Requires: Ark (210)
Level 3: Activates when the combat state continues for 5 sec. Can be stacked a max of 5 times. Duration: 5 sec.
When activated, damage increases by 1%, and damage increases an extra 3% per stack
Damage at max stacks: +16%
Guide Note: the following link skills are some additional options that may help you out, or provide better damage depending on your character. Tide of Battle can provide good damage if your rotation requires constant movement and can be used instead of either Combo Kill Blessing or Hybrid Logic.

Optional: Tide of Battle
Requires: Illium (210)
Level 3: Activated when moving a certain distance. Max number of stacks: 4 times, Duration: 15 sec, Damage per stack: +4%.
Hyper Skills & Stats
Hyper skills bossing passives
Advanced Combo Attack - Reinforce

Final Damage increased by 2% for each additional Combo Orb.
Advanced Combo Attack - Boss Rush

Boss Damage increases by 2% for each Combo Orb.
Advanced Final Attack - Opportunity

Activation Chance +15% for Final Attack.
Raging Blow - Reinforce

Damage: +20% for Raging Blow.
Raging Blow - Extra Strike

Number of Attacks: +1 for Raging Blow.
Hyper skills mobbing passives
(Frenzy - Interactive Server spawnrate only)
Advanced Combo Attack - Reinforce

Final Damage increased by 2% for each additional Combo Orb.
Advanced Combo Attack - Boss Rush

Boss Damage increases by 2% for each Combo Orb.
Raging Blow - Spread

Max Enemies Hit +2 for Raging Blow.
Raging Blow - Reinforce

Damage: +20% for Raging Blow.
Raging Blow - Extra Strike

Number of Attacks: +1 for Raging Blow.
Hyper stats setup suggestion for bossing
Hyper stats will depend a lot on the situation your character is in.
As a base-line I suggest you to do the following and build/change from there whatever you feel like you need, I can't really answer that question for you easily:● 10 Points in Crit Rate
● 10 Points in Crit Damage
● 10 Points in IED
● 10 Points in Boss Damage
● 10 Points in DamageHowever you could calculate what hyper stat situation most fits you at the moment at this website:
https://brendonmay.github.io/hyperCalculator/
Hyper stats setup suggestion for mobbing
Hyper stats will depend a lot on the situation your character is in.
As a base-line I suggest you to do the following and build/change from there whatever you feel like you need, I can't really answer that question for you easily:● 10 Points in Crit Rate
● 10 Points in Crit Damage
● 10 Points in EXP
● 10 Points in Monster Damage
● 10 Points in DamageHowever you could calculate what hyper stat situation most fits you at the moment at this website:
https://brendonmay.github.io/hyperCalculator/
Inner Ability
Miracle circulator strategy for rolling
Keep in mind that this is not for beginners and should only be done if you reach the mid-game or above, aim for attack speed +1 when you're just starting out since this is the most important line when going for 2H, make sure you have several millions of honor saved up before attempting this strategy.
Focus on the thick marked text mentioned below when rolling your Bossing IA with Miracle Circulators, this roll will always be max due to this. After this you'll use your honor to roll the first line.
Guide note:
Use the following link to figure out how much honor you should be saving up for this strategy:
https://brendonmay.github.io/innerAbilityCalculator/
Best inner ability for bossing
● Attack Speed Level +1 (most important line to aim for so get this one ASAP!)
● 10% Boss Damage
● 8% Damage Increase to Monster with Abnormal Status
Best inner ability for training
Option 1 - Suggested:
● Meso Obtained +20%
● Drop Rate Increase +15%
● Normal Monster Damage +8% (not really important but if you like to min-max your dmg to 1shot)Option 2:
● Drop Rate Increase +20%
● Meso Obtained +15%
● Normal Monster Damage +8% (not really important but if you like to min-max your dmg to 1shot)Option 3 - Interactive world with Frenzy spawn rate:
● Number of enemies hit by multi-target skills +1
● Meso Obtained +15%
● Drop Rate Increase +15%
Best inner ability for boss reward room
● Drop Rate Increase +20%
Legion

Under Construction: Work in Progress
This page will be updated around the end of June!
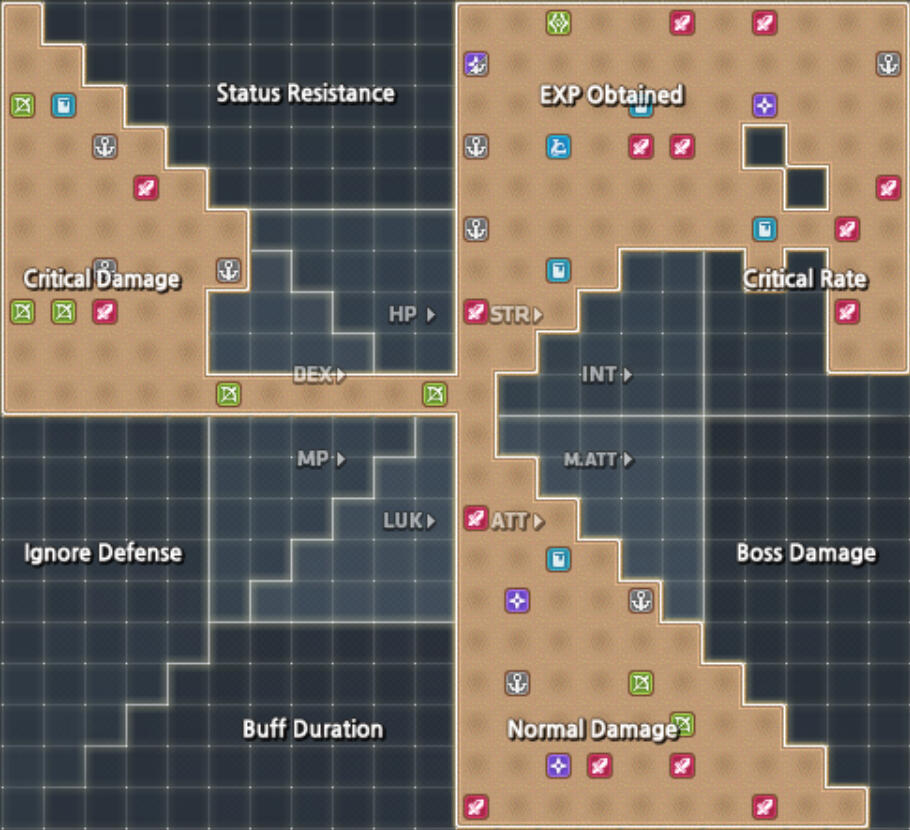
Legion Board: Bossing legion setup
Cookie Cutter Legion Setup Based On Prio:
Max CritDmg > Max BossDmg > Max IED > Max Buff Duration (up until 97% total in your Character stat window) > Max Critrate > Max Str > Max ATT
(ensure max crit rate when taking this prio into account)Focus on getting every single character that doesn't give INT or LUK, here you can find the link of all possible legion block effects:
https://maplestorywiki.net/w/Legion_System
If you are bad at knowing what to put where then use this useful site:
https://xenogents.github.io/LegionSolver/
Legion Board: Endgame bossing setup layout sample
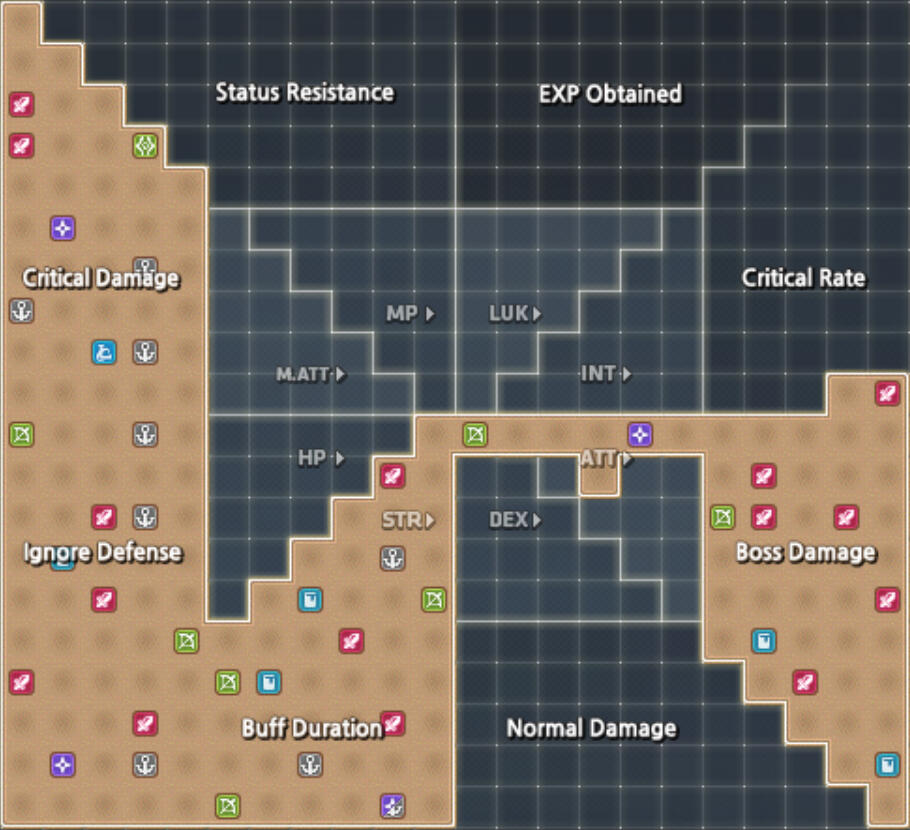
Legion Board: Training legion setup
Cookie Cutter Legion Setup Based On Prio:
Max CritDmg > Max EXP Obtained > Max Normal Damage > Max CritRate > Max Str > Max ATT
(ensure max crit rate when taking this prio into account)Focus on getting every single character that doesn't give INT or LUK, here you can find the link of all possible legion block effects:
https://maplestorywiki.net/w/Legion_System
If you are bad at knowing what to put where then use this useful site:
https://xenogents.github.io/LegionSolver/
Legion Board: Endgame training setup layout sample
Legion Artifact: Artifact setup
Still W.I.P. but you can use below’s setup:Cookie Cutter Crystal Configuration Based On Prio:[Crystal 1 + 2] Boss damage, DMG, Crit Rate
[Crystal 3 + 4] Crit DMG, Buff Duration, IED[Crystal 5 + 6] All Stat, ATT, Final Attack (If you prefer doing more damage)
or
[Crystal 5 + 6] Drop, Meso, EXP (if you prefer farming/training)[Crystal 7 + 8] Whatever you didn't pick for Crystal 5 + 6
Crit Rate

Under Construction: Work in Progress
This page will be updated around the end of June!Because we're using the Shine class link skill now we're going to need a lot less buff duration which allows us to put a more points in critrate in legion, this results in less critrate required in hyper stats or other sources.
Crit rate breakdown
● Base Rate: 5%
● Chance Attack: 20%
● Decent Sharp Eyes: 10%
● Marksman Level 200 Legion Effect: 4%
● Night Lord Level 200 Legion Effect: 4%
● Weapon Mastery: 15%Total: 58% Critical RateThe other 42% must be made up from a combination of Inner Ability, Legion Grid, Hyper Stat, Familiar Badges and/or Link skills.
Other crit rate sources
● Inner Ability: 20%
● Legion Grid: 0-40%
● Hyper Stat (levels 0-10): 0-15%
● Familiar System Ocean Badge: 1% (max cap is 3% in total)
● Familiar System Rebel Badge: 1% (max cap is 3% in total)
● Familiar System Commerci Badge: 1% (max cap is 3% in total)
● Familiar System Holy Badge: 1% (max cap is 3% in total)
● Marksman Level 250 Legion Effect: 1% extra compared to Legion Effect 200 (5% in total)
● Night Lord Level 250 Legion Effect: 1% extra compared to Legion Effect 200 (5% in total)
● Explorer Archers Link Skill (level 1/2/3/4/5/6/7/8/9): 3% / 4% / 6% / 7% / 9% / 10% / 12% / 13% / 15%
● Phantom Link Skill (level 1/2/3): 10% / 15% / 20%
● Lynn Link Skill (level 1/2/3): 3% / 7% / 10%
● Legion Artifact: 0-20%
Basic 100% crit rate setup as a beginner
Previous Total: 58% Critical Rate● Hyper Stat (level 10): 15%
● Phantom Link (level 2): 15%
● Explorer Archers Link Skill (level 6): 10%
● Familiar System Rebel Badge: 1%
● Familiar System Ocean Badge: 1%Total: 100% crit rate.Your goal is to get rid of the Lynn and Phantom link skill first and try to obtain the other crit rate sources mentioned by the most optimal critrate setup at the endgame critrate setup below.
Most optimal crit rate setup at endgame
Previous Total: 58% Critical Rate● Hyper Stat Level 11: 17% (or ● Legion grid 17 points: 17% (only possible with high legion level 10.5k+) or a mix of both for efficiency)
● Marksman Level 250 Legion Effect: 1% extra compared to Legion Effect 200 (5% in total)
● Night Lord Level 250 Legion Effect: 1% extra compared to Legion Effect 200 (5% in total)
● Familiar System Ocean Badge: 1% (max cap is 3% in total)
● Familiar System Holy Badge: 1% (max cap is 3% in total)
● Familiar System Rebel Badge: 1% (max cap is 3% in total)
● Legion Artifact: 20%Total: 100% crit rate.Most of the time with events there are event stats, you can put 1 / 2 point into critrate there which usually results in giving you 5% / 10 crit rate, allowing you to put less points into your hyper stats and/or legion grid.
Important 1-4th Job Skills
Key Skills!
Take a proper look at these skills to understand them. These skills are essential for maximizing your effectiveness in boss fights. While mastering these is critical, don’t forget to review all of Hero’s skills in-game—you might discover additional useful tools for your playstyle!

War Leap (Flash Jump/Movement Skill)
● Double jump skill, allows you to jump a greater distance.
● Active by double pressing your jump key.
● Press the up key at the same time to move upward.Guide note:
Our old skill Upward Charge got merged with this skill, a good thing to know is that after the upjump you can press your jump key again to flash jump forward in the sky.

Leap Attack (Movement Skill)
● You will rapidly drop to the ground once you use this skill in the air.
● Can also be activated by pressing the Down Arrow Key and Attack Key togetherGuide note:
Make sure to bind this skill to a key on your keyboard and learn to use this skill, it can save you or make you able to deal damage quicker to the boss again due to it's fast movement.

Flash Blade (Movement Skill)
● Dash forward in 8-directions based on arrow key input. No key input will dash in the direction you are facing.
● A charge is stored every 4s. A maximum of two charges can be stored.
● While dashing, prevents you from being knocked back at all (Super Knockback Resistance).Guide note:
Make sure to bind this skill to a key on your keyboard and learn to use this skill, it can save you or make you able to deal damage quicker to the boss again, this is one of the main mobility skills for Hero!

Rush (Movement Skill)
● Dash forward while pushing enemies back.
● While dashing, you will not be knocked back at all (Super Knockback Resistance).Guide note:
Make sure to bind this skill to a key on your keyboard and learn to use this skill, it can save you or make you able to deal damage quicker to the boss again.

Scarring Sword (Buff Skill)
● 100% chance to pierce the enemy when attacking while skill is active.
● Decreases Accuracy by 20% and Attack Power by 30% of pierced enemy for 20 seconds.Guide note:
Make sure it’s always up (I suggest putting it on your pet's auto buff slot) for the pierced debuff for the skill Chance Attack.

Chance Attack (Passive Skill)
● Final Damage (to pierced, incapacitated enemies): +25%
● Permanently increases your Critical Rate by 20%.Guide note:
Make sure the Scarring Sword buff is constantly applied to make sure this passive is being utilized!

Raging Blow (Main Attacking Skill)
● Instantly slash several times to multiple enemies in front of you.
● The final blow will always be a critical hit.
● The skill is enhanced when your combo orbs are fully chargedGuide note:
This is your main attacking skill, you'll be using it most of the time during mobbing and bossing.
Attacks such as Instinctual combo only appear when attacking with Raging blow.
This skill later on gets upgraded to HEXA Raging blow, check our 6th job page in the guide to learn more about this skill.

Puncture (Debuff Skill)
● Attacked enemies have a 100% to take damage every 2 sec, for 60 seconds.
●Deal 25% more % damage to afflicted enemies. When a party member attacks, this increases by 10%.Guide note:
Make sure this debuff is up on the boss all the time, keep in mind that this does not increase your final damage, it just increases your own %dmg stat by 26% if the monster/boss is affected by the debuff and the rest of your party’s dmg stat by 11% if they attack the same monster/boss.
This skill also can be used as your mobbing skill in some maps because the hitbox is way different compared to Raging blow.
This skill later on gets upgraded to HEXA Puncture, check our 6th job page in the guide to learn more about this skill.
IF TWO HEROES ARE IN THE SAME PARTY, THE BONUS DAMAGE (26%) APPLIES ONLY TO THE HERO WHO APPLIED PUNCTURE SO MAKE SURE THE ONE USING ORIGIN DEBUFFS IT BEFOREHAND!

Hero's Will (Survivability Skill)
● Removes certain abnormal status effects and become immune to Abnormal Status for a few seconds
● Cooldown: 360 seconds.Guide note:
Master this skill early on—it’s essential for handling future bosses, especially in tough situations. For example, it grants immunity to the stun effect from multiple attacks in the Lotus fight, and it can help you survive many other mechanics. Practice using it frequently during bossing to understand its full potential and how it can save you in various scenarios in the future.
5th Job

Under Construction: Work in Progress
This page will be updated around the end of June because the 5th job UI got revamped!
Boost Nodes and Priorities and Special V-Skill info
Hero relies on two key trios, totaling 6 core skills. For optimal performance:
● Level all 6 skills to 50 as a baseline.
● Apply a +5 level boost to each to reach Level 60 across all six.Boost Node Core 1 (two of each, order doesn’t matter as long as it’s not the same main one):
● Raging Blow
● Cry Valhalla
● Final AttackBoost Node Core 2 (two of each, order doesn’t matter as long as it’s not the same main one):
● Rising Rage
● Beam Blade
● PuncturePriority for training:
● Boost Nodes (until able to one-shot)
● At least level 1 DSI and DSE and DHS (for critrate/dmg and faster attack speed and EXP)
● At least level 1 Erda Shower - Erda Fountain (level it up if it isn’t clearing the spot where you placed it down)
● Max DHS (for more EXP and Drop rate)
● Max BSB (for longer duration)
● Max Weapon AuraPriority for bossing:
● Max Core Boost Node
● Level 1 DSI, DSE, DCO, Erda Nova and WR
● Max BSB and IC (split evenly-ish depending on your preferred playstyle)
● Max SI
● Max Weapon Aura
● Max Maple World’s Goddess Blessing
● Max Erda NovaWhich Special V-Skill to use/craft?:
● Fatal Strike
Maxed V-Matrix Sample

Hero Specific Skills


Burning Soul Blade (Normal)
Burning Soul Blade (Stationary)
When used, fully charges your Combo and summons a soul blade near you.By default, pressing the skill key will activate the skill in the "Normal" mode and pressing the skill key with the down arrow will activate the skill in the "Stationary" mode. Right-clicking the skill will enable the "Action Customization"; this reverses the above (i.e. default is stationary, and key+down is normal).Normal
● Summons the blade behind your character. The soul blade will quickly attack when you do.
● Duration = 20sStationary
● Summons the blade on your character in the stationary state. Pressing the skill key again will move it to your new current location.
● Duration = 120sThe sword's attacks have increased %Crit Rate.
Cooldown: 120 sec.Guide Note's Guide Note:
As of GMS v267, you only use Normal mode for bossing and Stationary mode for mobbing.
This skill in Normal mode is a big part of our overall damage during boss fights, be sure to always use it in Normal mode during bossing.

Worldreaver
Slices nearby enemies in half dealing tremendous damage● While casting, you are invulnerable
● Unaffected by Damage ReflectMax Enemies Hit: 15, Damage: 880%, Number of Attacks: 14, Invulnerable while casting.
Cooldown: 25 sec.Guide note:
This skill is a full-map attack (FMA) that also grants a 1.25s i-frame, use this skill to survive specific boss mechanics or take advantage of it and allowing you to continue to attack the boss.

Sword Illusion
Slashes forward several times and creates an explosion.● Upon use, briefly increases amount of %Final Damage provided by Combo Attack
● Unaffected by Damage ReflectMax Enemies Hit: 8, Damage: 275%, Attack Count: 4, Chase Cut Activation Count: 12. Afterwards, activates 5 explosion(s), which attack 5 time(s) for 550% damage.
While Combo Attack is active, upon use, increases Final Damage for 8 sec by the Final Damage bonus of the 6 Combo Orbs. Final Damage increase from Combo Orb is additive.
Cooldown: 30 secGuide note:
This is a two part skill.
The first activation will do a small amount of damage followed by the second activation that will do a large number of attacks. The damage from the skill itself is very respectable and should be used off cooldown to improve our consistent damage, however save it when your burst is almost up and then use it after you pop Instinctual Combo to have a few seconds of very high burst.
This skill grants an 8s buff that provides the same damage increase as an additional 6 combo orbs.

Instinctual Combo
While active, using Raging Blow will create a 'Tear in Space'.● Increases Combo Attack stat bonuses of %Final Damage, %Boss Damage, and Attack.
● Decreases chance of obtaining Combo Orbs by 50%.Can be used if you have at least 1 Combo Orb, Duration: 20 sec.
The Combo Orb increases Final Damage, damage to bosses, and Attack Power by 13%.
Decreases the chance of charging Combo Orbs by 50%.
Tear in Space: Periodically activates a rift 3 time(s). Dealing damage, Max Enemies Hit: 6, Number of Attacks: 6. Cannot charge the Combo Orb with the Tear in Space.
While active, using Spirit Calibur (Origin), the attacks and final blow will create Soul Traces.
Soul Trace: Attacks all enemies hit by Spirit Calibur dealing damage.
Cooldown: 120 sec.Guide note:
This is our main burst skill due to the buff it provides us and also dealing good damage by itself.
A majority of our damage will come from this 20s window where this buff is going on, while this buff is active you want to be pressing Raging Blow constantly, .
The description of this skill isn’t quite what you think it is, it doesn't give extra 13% fd, 13% atk, and 13% boss but instead it gives 13% of the attack, boss, and final damage that your orbs give so it's not as much as you may think it actually gives.
Common Skills

Weapon Aura
Increases %Ignore DEF, %Final Damage, and your attacks periodically create a damaging wave.HP Cost: 100, Ignores 16% Enemy DEF for 130 sec, Final Damage: +6%.
Aura Wave (Usable Every 5 sec) - Using certain offensive skills will generate waves, inflicting 1100% damage on up to 10 enemies, 6 times.
Cooldown: 120 seconds.Guide note:
Put this skill on your pet auto buff!

Maple World’s Goddess Blessing
While active, increases %Damage and the stat bonuses of Maple Warrior.
Increases stat bonuses for class-wide buff skills like Maple Warrior by 400% for 60 sec, Damage: +20%
Cooldown: 120 sec

Impenetrable Skin
While active, gain increased Abnormal Status Resistance and cannot be knocked back at all (Super Knockback Resistance).
HP Cost: 100 of Max HP, Duration: 18 sec, Knockdown Immunity and Status Resistance: +80
Cooldown: 120 sec
[Passive Effects - STR: +30, Max HP: +1500]

Blitz Shield
Create a shield based on your %Max HP that blocks damage
When the shield expires or the Skill Key is pressed, the shield explodes damaging nearby enemies
Shield must be active for at least 2 secs before it can be detonated
HP Cost: 100
Creates a protective shield that blocks 21% of your Max HP as damage for 5 sec.
When the shield expires or the skill is activated again, it detonates and inflicts 1100% damage to 12 enemies 5 times.
Your shield must be active for at least 2 sec before it can be detonated.
Cooldown: 15 sec

Erda Nova
Bind enemies in a surrounding area
Ignores Damage Ignore and Damage Reflect
HP Cost: 100, Damage: 330%, Max Enemies Hit: 10, Number of Attacks: 5, Bind Duration: 10 sec.
Bind Duration increases by up to 100% based on damage inflicted with Erda Nova.
Cooldown: 100 sec.

Will of Erda
Removes certain abnormal status effects and become immune to Abnormal Status for 3 secs
HP Cost: 100 Cooldown: 330 secGuide note:
Learn to use this skill, it's a very strong skill that allows you to survive some boss mechanics easily.
Mainly used for the immunity in bossing such as:
● Black Mage’s Curse (Does not remove the current curse but does prevent the next one, You will still receive %HP damage from attacks.)
● Gloom’s Petrify.
● Will’s web skill lock in phase 3.


Erda Shower
Erda Fountian
The attack has two modes depending on the keys pressed[Erda Shower] - Releases a surrounding area attack.
Can be activated by pressing the Skill Key.
The cooldown is slightly reduced upon defeating an enemy.
Max Enemies Hit: 15, Damage: 900%, Number of Attacks: 6, Cooldown reduced by 2 sec per attacked enemy
Cooldown: 40 sec.[Erda Fountain] - Places down a stationary summon that attacks whenever a fixed amount of enemies are defeated.
Can be activated by pressing the Down Arrow Key and Skill Key together.
Both skills share the same cooldown.
Right-clicking the skill will toggle a function ON/OFF that swaps the activation command for Erda Fountain and Erda Shower.
Object Summon Duration: 60 sec. Every time enemies in a map with the summoned object are defeated, the Erda released from the enemies condenses around the object.
Defeating 12 or more will release the gathered Erda, Max Enemies Hit: 10, Damage: 900%, Number of Attacks: 4
Cooldown: 60 sec.
Cooldown shared with Erdas Shower and Erda Fountain.Guide note:
Erda Fountian is the skill you will be using mainly to help you with mobbing.

Rope Lift
Grapple onto a platform above and launch towards it[Passive]: Permanently grants flat All Stats.
Pressing the Jump Key while launching up will cancel the grapple early.
Press the skill key while you're climbing to cancel.
Cooldown: 3 sec.
[Passive Effect - All Stats: +30]

Blink
When used, teleport to a random location on the map[Passive]: Permanently grants flat Attack
Holding the Skill Key while in the air allows you to float briefly
HP Cost: 100. Teleport to a random location on the map.
Float for up to 5.0 sec. if you hold the key in the air
Cooldown: 20 sec.
[Passive Effect - Attack Power & Magic ATT: +30]

True Arachnid Reflection
Release a large attack and place down a stationary summon that periodically attacks enemiesSummon stops attacking early when striking a single enemy consecutively.
Skill is obtained from Mirror World Nodestone that is rewarded from completing the Esfera storyline and as a drop from Hard Will.
Unaffected by Damage Reflect.
HP Cost: 100.
Spatial Collapse - Max Enemies Hit: 15, Damage: 1008%, Number of Attacks: 15, Once complete, summons True Arachnid Reflection.
True Arachnid Reflection - Duration: 50 sec, Goes into attack mode at set intervals. During attack mode, uses spider legs 10 times to deal 392% damage 8 times. If the spider legs attack one target 5 consecutive times, attack mode will end immediately. 3 sec cooldown after attack mode ends.
Cooldown: 230 sec.

Solar Crest
Release a large attack and summons an emblem that periodically attacks enemiesSummon deals increased damage when striking a single enemy.
Skill is obtained from Mitra's Nodestone that is dropped from Hard/Extreme Seren.
Unaffected by Damage Reflect.
HP Cost: 100.
Mitra's Fire: summons a Flame Emblem after dealing 1650% damage up to 15 enemeis 12 times.
Flame Emblem: deals 440% damage to up to 2 enemies 6 times every 2.1 sec for 51 sec. Deals 605% damage if striking a single enemy.
Cooldown: 230 sec.
Useful Decent Skills

Decent Holy Symbol
Increases the amount of EXP gained from enemiesDoes not stack with Holy Symbol (Bishop, 4th Job).
Duration: 270 sec, EXP: +35%, Drop Rate: +24%.
Cooldown: 180 sec

Decent Speed Infusion
Attack speed +1 Level
[Passive Effect - All Stats +6]

Decent Holy Fountian
Create a fountain which pressing the Up Arrow Key restores some %Max HPHas a fixed number of uses before the fountain disappears
If the fountain disappears early, a Vestige of Divinity is created for the remaining duration that prevents another fountain from being summoned
Does not stack with Holy Fountain (Bishop, 4th Job)
HP Cost: 0, Duration: 60 sec, restores 35% HP when used, able to use 20 times total.
If it disappears before duration is up, Vestige of Divinity is created in the remaining time.
Cooldown: 60 sec
[Passive Effect - All Stats +6]Guide note:
Make sure to learn to use this, it will help you survive a lot more!

Decent Sharp Eyes
Temporarily grants critical rate and critical damage.HP Cost: 0, Duration: 270 sec, Critical Rate: +10%, Critical Damage: +8%
Cooldown: 180 sec
[Passive Effect - All Stats: +6]

Decent Combat Orders
Temporarily grants bonus skill levels to skills.4th Job Skills can be raised past their Master Level.
[Exception]: Beginner skills, Combat Orders, Hyper Skills, 5th Job, and 6th Job Skills.
HP Cost: 0 Duration: 270 sec, All Skills: +1.
Cooldown: 180 sec.
[Passive Effect - Abnormal Status Resistance: +6]

Decent Advanced Blessing
Attack Power: +20, Magic ATT: +20, Defense: +425, Max HP: +475, Max MP: +475
Does not stack with Bless (Bishop, 2nd Job) or Advanced Blessing (Bishop, 4th Job)
[Passive Effect - All Stats: +6]
6th Job
HEXA Leveling Order
"Energy Limited" - Optimized Route
GUIDE NOTE: The following is a quick legend; continue reading page for skill/icon names and descriptions.

Origin

Ascent

M1

M2

M3

M4

IC

BSB

SI

WR

HEXA-1

HEXA-2

HEXA-3

Hecate
This prioritization order is recommended when you are limited by the amount of Sol Erda Energy in your possession.

1

1

9

1

1

7

1

19

7

1

29


18

7

4

4

18

4

4

29

1

28

18

4

7

7

7

29


10

30

29

9

9

9

10

25

4


30

30

19

19

20

30

29

29

29

28

20

30

29

28

30

30

30

29

30

30

30
"Fragment Limited" - Optimized Route
GUIDE NOTE: The following is a quick legend; continue reading page for skill/icon names and descriptions.

Origin

Ascent

M1

M2

M3

M4

IC

BSB

SI

WR

HEXA-1

HEXA-2

HEXA-3

Hecate
This prioritization order is recommended when you are limited by the amount of Sol Erda Fragments in your possession.

1

2

2

9

1

5

1

5

9

1

3

18

9

6


29

9

18

1

4

3

4

3

18

27


10

3

6

7

6

26

17

29

10

30

9

9

9

29

19

20

3

29

15

20


30

17

17

10

30

19

19

19

30

29

30

29

29

26

20

29

30

25

30

30

29

30

30

30
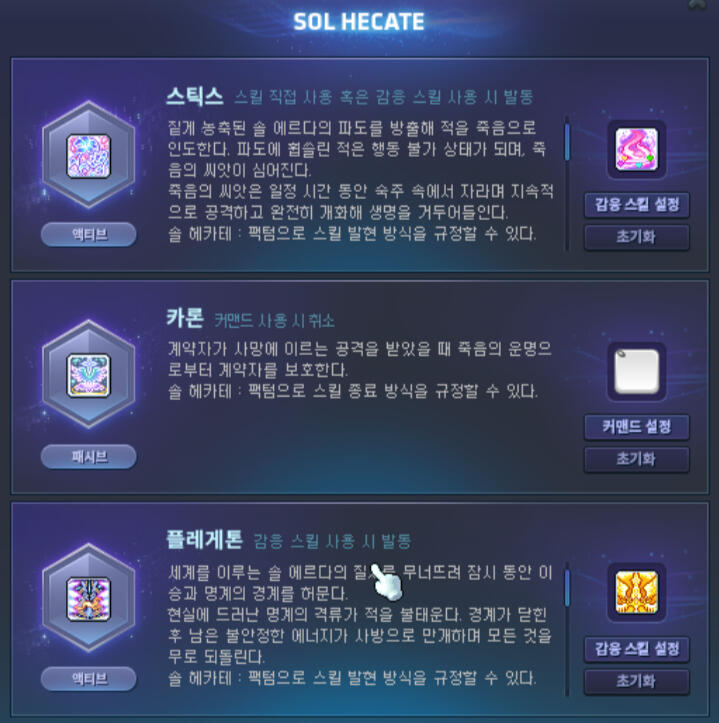
Sol Hecate UI Setup

Auto Skill Proc Setup
Upon unlocking Hecate you can open the Hecate UI.
Further information regarding each skill and what Sol Hecate is will be explained further below in the Common Skills section, here is what I suggest regarding the setup of this UI:Skill 1: Styx - Unlocks at skill level 1
● Suggestion: Link this to your Angelic Buster link skill so it will automatically use it when your sequence with Angelic Buster is used.
● Optional: Use the skill manually depending on the boss (smart to probably manually use it in Destiny missions or actual mincut runs, outside of that just use my suggestion).Skill 2: Charon - Unlocks at skill level 20
● Automatically used when you die.Skill 3: Phlegeton - Unlocks at skill level 30
● Suggestion: Link this to your Cry Valhalla skill so it will automatically use it when your sequence with Cry Valhalla is used.
HEXA Stat

HEXA Stat Setup
Upon beginning 6th job, you will unlock HEXA Stat 1 (i.e. at level 260). To unlock the remaining HEXA Stats, you must reach the level requirement and level the previous HEXA Stat to 20.HEXA Stat 1 - Unlocks at Level 260
● MAIN STAT: ATT
● ADD'L STAT: Crit Damage, STRHEXA Stat 2 - Unlocks at Level 265
● MAIN STAT: Crit Damage
● ADD'L STAT: STR, ATTHEXA stat 3 - Unlocks at Level 270
● MAIN STAT: STR
● ADD'L STAT: Crit Damage, ATT
Example HEXA Stat 1 Setup:
● MAIN STAT to ATT
● ADDITIONAL STATS to Crit Damage and STR
● Keep leveling your Hexa Stat 1 until your MAIN STAT reaches level 3 because the cost will go up from 10 to 20 per level up.Decision point when MAIN STAT reaches level 3 of Hexa stat 1:
● Max Now: Slight damage boost to all skills.
● Delay: Focus on specific skills (for example a burst skill in order to kill a burst-focussed boss)Whether you delay or not, you should finish HEXA Stat 1 by the time the leveling order suggests starting HEXA Stat 2. Similarly, HEXA Stat 2 should to be completed prior to starting HEXA Stat 3, etc.Once the HEXA Stat has been completed, the optimal distribution should prioritize: ATT > STR > Crit Damage (or, as suggested by your Maple Scouter calculation). When you re-order your skills using the UI's "Change Stats" functional, you will likely not align to the layout as described above. Regardless, the first three HEXA Stat cores should be ABC, BCA, CAB.Guide note:
Use MapleScouter to determine the best setup for your character, you can find a youtube video explain it by clicking HERE, credits to Kobe.
Common Skills

Sol Janus (Dawn and Dusk)
Sol Janus:
Passive Effect: EXP Obtained
Level 30: 30% normal monster damage increase.Dusk:
Passively attacking nearby monsters when in combat.
Level 1-14 = 9 primal crystals
Level 15-29 = 10 primal crystals
Level 30 = 11 primal crystalsDawn:
Level 1-9 = 1 summon with a 60 seconds duration
Level 10-19 = 2 summons with a 70 seconds duration
Level 20-29 = 3 summons with a 80 seconds duration
Level 30 = 3 summons with a 120 seconds durationFor all levels cooldown: 60 secondsGuide note:
This skill will solve most of our mobbing issues!
Aiming for level 10 and level 20 as soon as possible will be very nice if you like to focus on mobbing and you feel like you don’t need the damage right now!
I suggest getting at least unlocking M1,M2,M3 and M4 on your Hero before you level this skill however pushing further is completely dependent on your account and personal goal.
If you need more damage then focus on the order above, if you want more lazy training or exp then go for level 10, 15 or 20 Sol Janus.

Sol Hecate
Sol Hecate
A new skill that collects Sol Erda, drawn in by the Adversary’s resolve, to form a familiar.
Sol Hecate will grow as its level increases. When it reaches certain levels, additional exclusive skills will be activated.The Sol Erda drawn in by the Adversary’s resolve is collected to form a familiar. Sol Hecate reacts to the Adversary’s will to automatically attack enemies and use its special skills.
Sol Hecate will grow based on its level, and when it reaches certain levels, it will activate additional special skills that can be used.
You can set which skills Sol Hecate will react to and use its special skills through Sol Hecate: Pactum.
Sol Hecate will prioritize attacking the boss monster with the highest max HP. If it hits an enemy using Damage Reflect, you will not take damage.
On/Off skill.
Sol Hecate Translucency Applicaton On/Off: Right-click.● Level 10: 20% defense ignore, 20% boss damage.
● Level 20: Activate the special skill Charon, 20% defense ignore, 20% boss damage.
● Level 30: Activate the special skill Phlegeton.Summon Sol Hecate.
Sol Hecate will automatically track enemies and periodically create 4 high-density Sol Erda Particles.
Sol Erda Particle: Deals X% damage X times.Level 1
Sol Hecate – Automatically tracks and attacks enemies.
Sol Hecate: Styx – Attacks and binds enemies for 4 seconds with 1 minute cooldown. This bind stacks with other bind durations (i.e. if you use it immediately after Erda Bind, the enemy will be bound for 10+4 = 14 seconds.) You can use Sol Hecate: Pactum to link this with one of your other skills (e.g. AB link) to have Sol Hecate automatically use Styx when that skill is used. Otherwise, you can cast Styx manually by hotkeying it separately.Level 20
Sol Hecate: Charon – If you are hit by an attack that would kill you, it will be ignored and you will be invincible for 10 seconds with a 10 minute cooldown. You can use Sol Hecate: Pactum to set a hotkey to end the invincibility effect early.Level 30
Sol Hecate: Phlegeton – Attacks enemies with a big burst of damage with a 2 minute cooldown. You can link this with another skill just like Styx or use it manually.● Sol Hecate: Styx
A new skill that releases a wave of densely concentrated Sol Erda to lead enemies to their death.Release a wave of densely concentrated Sol Erda that leads enemies to their deaths. Enemies caught in the wave will be bound and the Seeds of Death will be planted on them.
The Seeds of Death will grow within them for a certain period of time to attack continuously, then take their lives when they fully bloom.
You can set how the skill manifests with Sol Hecate: Pactum.Deals X% damage X times on up to 15 enemies.
Enemies hit are bound for 4 seconds.
Enemies hit will be inflicted with the Seeds of Death debuff for 3 seconds.
Styx’s bind stacks with other binds and is applied additionally. After the bind is applied, there is a bind resistance of 47 seconds.
Seeds of Death: When growing, deals X% damage X times. When they fully bloom, activate 7 life harvests that deal X% damage X times.
Cooldown: 60 seconds.● Sol Hecate: Charon
A new skill that protects the contract holder from their fate of death when hit by a fatal attack.Protect the contract holder from their fate of death when hit by a fatal attack.
You can set the skill end method with Sol Hecate: Pactum.
If your HP reaches 0, this skill will activate and ignore the death. Afterwards, you are invincible for 10 seconds.
You can end the invincibility by using the command set through Sol Hecate: Pactum.
Reactivation cooldown: 600 seconds.● Sol Hecate: Phlegethon
A new skill that disrupts the order of the Sol Erda that forms the world to temporarily break the barrier between the living and the underworld.● Sol Hecate: Pactum
A new skill that aligns Sol Hecate’s will with the Adversary, controlling how Sol Hecate’s exclusive skills manifest.Disrupt the order of the Sol Erda that forms the world to temporarily break the barrier between the world of the living and the underworld.
The underworld’s torrents manifested in reality incinerate enemies. After the rift closes, the remaining unstable energy blooms in all directions to turn everything into nothingness.
You can set how the skill manifests with Sol Hecate: Pactum.
Illustration Cutscene On/Off: Right-click.
Activate 8 torrents that deal X% damage X times on up to 15 enemies.
After the rift closes, activate 10 full blooms that deal X% damage X times.
Cooldown: 120 seconds.
Hexa Skills

Spirit Calibur (Origin Skill)
Channels your spirit into your sword and cuts everything down.● [Swordsmanship]
● Invincible during casting
● Applies Absolute Bind (10 second bind with a separate cooldown than our Erda Nova bind skill)
● Chase Cut occurs 12 times which attack up to 15 enemies with damage 33 times
● Final strikes occurs 48 times at the end for damage 15 times
Cooldown: 360 secUpon reaching these certain levels you’ll gain the following additional stats for this specific skill:
● Lv. 10: Ignore Defense +20%
● Lv. 20: Boss Damage +20%
● Lv. 30: Ignore Defense +30% and Boss Damage +30%Guide note:
A VERY strong skill but with a 6 minute cooldown.
Before popping it make sure you’ve popped all your buffs and then cast it instantly.

Ultrasonic Slash (Ascent Skill)
Unleashes a slash from the pinnacle of sword mastery, where sound itself is cut.● Invincible during casting
● Activate sword slash attacks that deal damage on enemies.
● Additional 60% defense ignore, 40% boss damage, 100% critical rate.Upon reaching these certain levels you’ll gain the following additional stats for this specific skill:
● Lv. 10: Ignore Defense +10% and Boss Damage +10%
● Lv. 20: Ignore Defense +10% and Boss Damage +10%
● Lv. 30: Ignore Defense +20%Ascent skills can be used 3 times in a boss battle with no cooldown.
Outside of boss battles the Ascent will have a 240 second cooldown after being used.Ascent skills can only be used when the boss monster with the highest max HP is attackable.
Ascent skills will not activate additional hits or effects that activate when your direct attacks hit a enemy.
Ascent skills will prioritize attacking the boss monster with the highest max HP, and they will deal damage even if the enemy is using Damage Reflect or Damage Ignore.Ascent skills’ damage is not affected by stat increases from the following effects:
Equipment: Hat
Equipment: Ring
Passive skill effects that activate under certain conditions
Active skill use effects
Monsters’ patterns and debuffs
Consumable/Cash items with less than 30 minute duration.Guide note:
Do NOT use the Ascent skill during your main burst and mini burst or during SI being active, as it does not benefit from active buffs!
Instead use it during off-burst windows (when you have the least amount of active buffs going on) to push boss segments or clear tests which helps you save your main burst for the next phase. It also doubles as an emergency iframe but the main goal for this skill should be to deal damage with it while no burst buffs are going on, however there will be situations where you can do this and use ti for survivability at the same time so make good use of it.
An example of a good usecase of the Ascent is in Will P2: after your initial burst and the 50% test, use Ascent 3x and standard attacks (DPM) to finish the phase instead of bursting again. This allows you to go into Phase 3 with your burst ready, probably saving you an entire burst cycle overall.
Another example is using your Ascents during the first minute in Gloom, he has a mechanic that when he takes a lot less damage when his eye is covered but Ascent ignores this mechanic fully as stated above because Ascent's damage is not affected by Monsters patterns.
Same goes for Lotus P1 shields, while the shield is active on Lotus he takes a lot less damage, breaking the shield usually takes a bit, however using your Ascent will pretty much instantly break it allowing you to have better damage overall and might result in you clearing the boss faster.
Mastery Skills

HEXA Raging Blow
Instantly slashes several times to slice multiple enemies in front of you.Raging blow
● Sword of Burning Soul’s regular mode attack range is increased.
● The skill is enhanced when combo is fully charged.Enhanced Raging blow
● Instinctual Combo and Burning Soul Blade’s regular mode attack range are increased.Both Versions
● [Swordsmanship]
● Required Skill: Raging blow Lv. 40 Boost
● Max Enemies Hit: 8
● Attack: 4 times
● The final two attacks are always critical hits.
● Increased hitbox for both versions compared to the original skill.

HEXA Rising Rage
Manifest the ancient warriors’ rage to destroy enemies in front of you.● 8 Lines
● Activates 4 strikes
● Max Enemies Hit: 10
● Required Skill: Rising rage Lv. 40 Boost
● Passive Effect: Hexa Raging blow’s damage is increased
● Increased hitbox compared to the original skill.Guide note:
Use this skill off cooldown with Hexa BB, except during IC bursts when you should only use Hexa RB.
If SI still has a cooldown of a second or two you're better off waiting for that and then pressing this skill to take advantage of the SI buff which results in this skill dealing more damage.


Rending Edge
HEXA Beam Blade
Unlocking the Mastery 3 HEXA Skill will unlock both Rending Edge and HEXA Beam Blade.Hexa Beam blade
Fire a sword slash in your desired direction that tears enemies apart. You can fire it in 8 directions, and if you use the skill with the arrow keys, it will be fired in that direction.
If you use the skill consecutively, you can link to Final Beam Blade.● Required Skill: Level 20 Beam blade.
● Fire a sword slash that deals damage 5 times on up to 8 enemies.
● Beam blade's damage is increased when attacking normal monsters.
● You will prepare 1 Beam blade stack every 4 seconds and you can hold up to 2.
● If you re-use the skill within 2 seconds, the next attack will be replaced with Final Beam blade.
● Final Blade: Deals more damage 5 times on up to 8 enemies.Guide note:
Use this skill before or after Hexa Rising Rage (depending on which cooldown hat you're wearing, check the hat page) twice resulting in casting Final Beam blade, except during your Instinctual Combo's buff when you should only use Hexa Raging blow.
Another thing to note is that HEXA Beam Blade is barely worth using, instead you could also just keep using HEXA Raging Blow and the damage loss would be very minimal.Rending Edge
Your swordsmanship reaches its peak, leaving behind Sword Scars. Sword Scars are created when your directly attacking skills hit enemies a certain number of times.● When your own directly attacking skills hit an enemy 5 times, create a Sword Scar. Cry Valhalla, Instinctual Combo, and Spirit Calibur are counted as 1 attack for every 2 hits.
● Sword Scar: Hits up to 8 enemies, 4 times, for 3 attacks each.
● When a Sword Scar attacks 32 times, it disappears. Can only attack a single enemy up to 4 times.
● Up to 5 scars can be created; during Instinctual Combo, up to 10 scars can be created.


HEXA Cry Valhalla
HEXA Puncture
HEXA Final Attack
Unlocking the Mastery 4 HEXA Skill will unlockHEXA Cry Valhalla, HEXA Puncture, and HEXA Final Attack.HEXA Cry Valhalla
Call upon great power imbued with the will of ancient warriors.● When Hero uses Swordsmanship skills, Sword Strikes remain at the attack location for a certain period of time like afterimages to additionally attack.
● The Sword Strikes prioritize being created at the boss monster with the highest max HP.
● Common skills and 5th job skills do not activate Sword Strikes.
● Required Skill: Level 1 Valhalla.
● For 30 seconds, you cannot be knocked back by any enemy attacks and your Combo is fully charged to the maximum value.
● During the buff, gain 50 attack, 30% critical rate, 100 status resistance, and 100% elemental resistance.
● Every few seconds, activate 3 Sword Strikes that deal damage 2 times on up to 6 enemies. The Sword Strikes can be activated up to 12 times, and after they have all been activated, they will no longer appear.
● Cooldown: 120 seconds.HEXA Puncture
Concentrate your mind and swing your sword in front of you. The sword engraved in your soul through ultimate swordsmanship appears to materialize and attacks enemies.
Enemies hit are inflicted with a wound that deals damage over time and increases % damage when the hit is a critical hit.● Required Skill: Level 30 Puncture.
● [Swordsmanship]
● Deals damage 4 times on up to 8 enemies.
● When attacking normal monsters, damage is increased by 50%.
● Enemies hit take damage every 2 seconds for 60 seconds and take 26% increased damage when your hits are critical hits.
● When party members attack, the enemy takes 11% increased damage.HEXA Final Attack
There is a certain chance for an additional hit to be activated after using your directly attacking skills.● The attack will prioritize hitting the boss monster with the highest max HP.
● Required Skill: Level 30 Advanced final attack.
● [Final Attack Type Skill] chance to activate a Final Attack that deals damage 3 times.
Enhancements Skills


Instinctual Combo Boost
Burning Soul Blade Boost
Sword Illusion Boost
Worldreaver Boost
Boosts the final damage of each specific skill that you level up.Level 1: Final Damage: +11%
Level 9: Final Damage: +19%
Level 10: Final Damage: +25%
Level 19: Final Damage: +34%
Level 20: Final Damage: +40%
Level 29: Final Damage: +49%
Level 30: Final Damage: +60%
Skill Sequence & Rotation Setup
Skill Sequence for Bossing
Burst (2 minute) sequence setup

Starting in the GMS v267 patch, there were some skill changes to Angelic Buster's link skill Terms and Conditions causing it to never delay again and can cause skills that can delay end due to the buff ending, same goes for Ring of Restraint (RoR5 and RoR6 affecting the sequence due to it being 20 seconds duration) resulting in our sequence changing and the maximum amount of buff duration we should be aiming for which is 98%, having less is also fine.
In the video above I'm showcasing at 95%.For clarity, the skills are:
Ring of Restraint > Burning Soul Blade > Terms and Conditions > Epic Adventurer > Maple Goddess Blessing > Cry Valhalla > Instinctual Combo (Optional > Blitz Shield ) .Blitz Shield is optional, you should have better survivability with it on but you can leave it off if you like to use it whenever you like yourself.
Mini Burst (60 second) sequence setup

For clarity, the skills are:
Spirit Blade > Terms and Conditions > Weapon Jump S Ring > Impenetrable Skin (Optional > Blitz Shield ) .Make sure you used your Ring Swap skill and that you have your Weapon Jump S Ring cooldown up before you try to press this sequence.
While Impenetrable Skin has a 120 second cooldown it won't mess with the cooldown timer of this sequence by the time you should be pressing it when you have it setup like this.
The reason we don't use Impenetrable Skin in our 2 minute sequence anymore is because you already get the effects from CV so this way it allows you to also have superstance on your 60's.
Blitz Shield is optional, you should have better survivability with it on.
Skill Rotation for Bossing
Basic Burst w/o Origin:
Puncture > True Arachnid Reflection > Solar Crest > [Skill Sequence] > Sword Illusion > Erda Nova > [Raging Blow]Basic Burst w/ Origin:
Puncture > True Arachnid Reflection > Solar Crest > [Skill Sequence] > Sword Illusion > Spirit Calibur > [Raging Blow] > Erda Nova* > [Raging Blow]* = cast Erda Nova after the Origin bind duration has expired, or is about to expire.
Guide Note: for both scenarios, once bind ends, you can optionally use "Aeonian Rise" (the liberated weapon I-Frame) to continue bursting safely, however be sure to cancel this skill by pressing it again since it MAY cancel out your Instinctual Combo, the easiest way to prevent this from happening is to just press it 1 second before your bind timer ends, this way you will make it end when IC still has 1 second left and this way it won't cause it to end exactly at 20 seconds.
Basic Skill Rotation for Culvert
The following culvert rotation does not make use of any different Skill Sequences from the one listed previously. It is possible to put Epic Adventure, Maple Goddess, and a placeholder skill into one sequence to reduce cast animation just put a random skill like Spirit Blade in it to meet the minimum 3 buffs requirement.Check the #Culvert channel the Hero Discord for additional versions, information, or cooldown reduction versions that deal more damage.
Culvert Rotation v269 (-0s CD, Lv.250 Merc):Pre-Culvert (In Lobby):Use Epic Adventure (EA) + Maple Goddess Blessing (Goddess)
32s Left on EA - Cry Valhalla (CV)
30s Left on EA - Burning Soul Blade (BSB) in Stationary
29s Left on EA - Proc Fatal
22s Left on EA - Instinctual Combo (IC)
17s Left on EA - Attack the Dummy to Proc CONT
13s Left on EA - Summon Hecate and ENTERCulvert:Make sure during the run when Instinctual Combo isn't up to use Beam Blade > Rising Rage when both skill are up and if you can delay case Beam Blade > Rising Rage exactly after SI then this is optimal because you may be able to use them again before SI ends due to server lag.During Countdown - Re-plant BSB
112 - SI
107 - Puncture when Boss at Stage 6
82 - SI + AB
62 - 3x Ascents
60 - Puncture + Sequence 1: EA + MG
52 - SI + Will + Seren
33 - Ring Swap Skill to ROR
22 - Sequence 2: ROR + BSB + AB + CV + IC + SI + SCRotation should be basically the same for Lv.200 Merc except for final burst at 21s, be sure to check when Fatal procs for future reference to fit as much as possible of it in your SC (origin).
Final burst at 22s to try and take advantage of buff delay + IC server lag. It shortens the burst at the beginning though.
Guide Note: To proc fatal, use an attacking skill but do not hit a target. To proc CONT, use an attacking skill and hit a target.
Good Techniques to Lean & Common Mistakes
Good techniques to learn
Jumping with RB
Jump + RB RB
Minimizes attack count loss from using Raging Blow while jumping.Double Jump + RB → Bounce-back Jump RB
Maintains maximum distance using Double Jump momentum while minimizing RB DPS loss.
Allows precise pattern dodging with minimal distance while keeping RB DPS loss low.Double Jump RB → Land → Immediate Jump+Direction input → Instant RB
Note: Requires precise jump timing!
RB Backstep
Uses Raging Blow's max range for safer positioning + minimizes Weapon Aura waste.Jump+Direction key → Opposite direction+RB
Must be executed extremely fast (inputs should be nearly simultaneous).This combos heavily with the bounce-back jump technique mentioned earlier.
Mastering this opens up many applications like:Sword Illusion Backstep
Weapon Aura Backstep
Upward Charge lets you input up to 2 skills mid-air
Holding RB during Upward Charge allows 3 skills with no delay (better DPS), but requires escape angle awareness.This technique enables relatively safe Sword Illusion + Raging Blow combos
Warning: Skills may whiff if you're not proficient with directional backshots.
Understanding and mastering Blink
Hero players must master Blink like second nature.
This isn't an advanced trick - it's fundamentals you have to master.From a DPS perspective:
Use it for precise positioning (avoid overshooting and wasting jumps).
Minimize damage downtime.
Double Jumping with RR or Erda Nova or Worldreaver
Rising Rage's long endlag makes Double Jump + Rising Rage an easy way to move while also not having issues with the recovery time.Similarly, skills with longer recovery than Raging Blow (for example Worldreaver/Erda Nova/Puncture) is also more efficient being used with this as shown below.When Double Jump isn't available:
Use the previously mentioned 'Jump + RB RB' technique instead.
Deal with the long recovery frames from the skills
Hero’s skills have extremely long recovery frames with real animation cancels, forcing us to carefully use skills while predicting boss mechanics.The standard approach (as shown below) involves:
Timing skills with pattern anticipation.
Using movement to cross behind the boss.Worldreaver also carries high risk – recommend pre-casting it before dangerous mechanics appear.
Make good use of the direction-locked movement skills
Hero's Upward Charge, Rush, and Flash Blade are direction-locked skills, they always go forward regardless of directional input.Key Advantages to using these skills while being debuffed:
✓ Works under Weakness (unable to jump).
✓ Works under Confusion (reverse controls).Important Notes:
⚠️ Attack-locked -Unable to switch OZ Rings due to it being concidered an attacking skill.
⚠️ Fixed movement - Requires boss mechanics experience for optimal positioning so you won't die.
Common mistakes
Not understanding the impact of jumping while using RB
Using Raging Blow while jumping drastically reduces your attack count (approximately 3 or fewer attacks in 10 seconds).
Unless you absolutely need to jump to avoid boss patterns, you should be planting yourself and dealing consistent DPS whenever possible.
1This example showcases how some Hero players move while there is nothing going on and thus wasting damage as explained above.When you absolutely must jump (for example against Extreme Lotus), use jump + Raging Blow (then let go of your jump button) and keep holding Raging Blow to minimize DPS loss as much as possible.However, even with this method, your damage will still be lower than standing still and attacking normally.
Not frequently checking your cooldowns
Sometimes players get too focused on boss patterns or spamming Raging Blow, to the point of neglecting other skills.
While Raging Blow is your core skill, Rising Rage, Hexa Beam Blade and Sword Illusion can burst out massive damage in an instant.
Ignoring them means losing out on 1.5x~2x potential DPS off burst.
Skill alerts alone won’t always fix this, so it’s crucial to build the habit of frequently checking your cooldowns and actually using the skills together.
Not properly using your movement skills
Using Flash blade and Leap attack effectively is ideal, but if you don’t use them in the right situations you can easily die because of them.
For example, against Verus Hilla, there are times to use Flash blade and times to use Leap attack. If you just brainlessly spam Flash blade, you’ll dash into attacks and fail to counter any patterns.
In the end, this comes down to mastering boss mechanics and learning how to use these specific skills in that specific boss or watching videos of others do it and try to copy what they do.
Forgetting to use Puncture
Be sure to ALWAYS have the Puncture debuff on the boss, it lasts 60 seconds and you see the icon ontop of the boss.Puncture planning:
Pre-Buff Timing: Cast Puncture~10sec before planning to burst.
If you forgot: Use Puncture immediately when starting your burst.
When you don't see the debuff on the boss anymore: Use Puncture as soon as possible, takes priority over basically everything besides, try to just debuff it at around 55 seconds, try to get used to this timing.
Credits to 하루냥 for all the clips on this page.
Future Hero Changes
KMS(T) Patch Changes
While Global Maplestory (GMS) is "Going West" -- many/most if not all of the changes made to Hero in Korea Maplestory (KMS) will likely make their way into GMS. So far, GMS has adopted all skill and character changes made in KMS. With that said, we can see what changes are coming to Hero by keeping up to date with the KMS patch notes. GMS patch updates typically lag KMS by about 6 months.
KMS ver. 1.2.413 (Expected in GMS in September/October)Special Skill Ring Reorganization
The Additional Special Skill Ring slot has been added.
When you have a level 4 or higher Restraint Ring or Continuous Ring equipped, a slot where you can equip an additional Special Skill Ring will be unlocked.
You can only equip 1 Active Special Skill Ring and 1 Passive Skill Ring.Special Skill Ring’s skill effects have been changed as follows.Restraint Ring
The area range has been increased by about 95%.
You can now use the skill again to reinstall the area.
The skill effect has been changed.
The attack/magic attack boost has been decreased from 95% to 85% (at level 6).Continuous Ring
The boss damage, attack, and magic attack boost effect will now activate when you use a skill.
The duration has been increased from 8 seconds to 30 seconds.
The reactivation cooldown has been removed.
The boss damage boost has been decreased from 195% to 54% (at level 6).These changes are specifically for Hero more beneficial compared to most classes since we're such a good dpm and burst class due to Raging Blow but we don't really have a good mini-burst, due to this change the Continuous Ring will always be up and should be a nice dmg gain! (exact numbers can't be said because it depends on your gear)
Also being able to replace ROR in a new spot will help us quite a bit since our burst is long (20s) and the likelyhood of us having to move in a boss is quite high due to having to dodge mechanics for example, this will allow us to just replace it and get full ROR value always.
KMS ver. 1.2.414 (Expected in GMS in October/November)Erda Fountian - Skill changed:You're able to re-summon it in a different location as long as you're in the map where you summoned it.
It will now automatically attack depending if you use an attacking key like raging blow, no need to kill a set number of monsters anymore for it to attack.
It will NO longer attack when you're lazy farming (rip, checked this with a KMS player).Blitz Shield - Hero 6th job version Common:Requires less fragments and sol erda than the other Common skills, it requires 137 Sol Erda and 4035 Sol Erda Fragments.
Passively attacks
Seems to be in the range of 2~4% fd increase in a full rotation ba for GMS against real bosses (in ba's it shows less but the skill seems to be proccing RE so there is hidden damage).
1.8s cooldown before it attacks again (this means no AS10 scaling).
Still attacks moving monsters/bosses (it's not like Rending Edge).
Can hit multiple monsters/bosses (up to 3 or 4 from what I've seen but it's quite random, probably works for sure if the BM statues in P1 are stacked on top of each other).
Does not cancel out Instinctual Combo skill duration delay (nice!).
Other Resources
Maplestory (Official Website)
Main place to check for all the latest news, patch notes, events, and maintenance schedules. The site has a number of official guides that are worth checking out if you're very new.
Orange Mushroom's Blog
Active and up-to-date unofficial blog that keeps track of the latest KMS and KMST patch notes and events. Great place to check to see what might be coming to Maplestory GMS.
Grandis Library
Unofficial information hub for all things Maplestory including content, classes, and events. It also contains a rather robust Resource links page; feel free to check it out.
The Maplestory Wiki
Unofficial wiki and "[the] most comprehensive and up-to-date knowledge base about MapleStory, written and maintained by players globally."
NamuWiki (Hero)
Unofficial wiki and largely updated to the current KMS released content. The linked page is specific for the Hero class.
MathBro's Maplestory Tools
Various maplestory tools that can be used for calculating probabilities of cubing, starforcing, flaming, and inner ability RNG. Tools for WSE, hyper stats, and legion as well.
Whackybeanz Maplestory Guides and Resources
Multiple resources and guides for Maplestory. EXP calculator, planner, and tracker; symbol tracker; flame calculator and planner; as well as guides on flaming, cubing, and starforcing.
Hat Potential
What is the best for Hero?
If you're trying to figure out which hat to run on a Hero, it usually comes down to how much you value raw damage versus comfortability, surviving and forcing extra bursts, the guide will only cover 3 line potentials due to anything else just not being worth it and is mainly focused on Heroic servers.A quick TLDR for everyone who is using Hero as their Bossing Mule or Legion Champ: If you get any of these 3 highlighted options you settle with the one you get first.Here's how it actually plays out in bossing if we actually go into detail:Option 1: 3L STR - This is pure damage:
It's usually the best choice for standard party bossing because your timers naturally sync up with everyone else who has a 3L stat hat.
The main downside of this hat is that it forces you to press Sword Illusion the moment it comes off cooldown in order to not delay your mini burst or big burst or to just not use it which is really not prefered.Option 2: -2s CD + 2L STR - You give up a bit of stat for comfort:
With this hat Sword Illusion has a 26.2 second cooldown, resulting in you being way more flexible when you can use it compared to what I told you above with the 3L STR option.
This is the hat potential most Hero players who are actually maining the class in Heroic should aim for in my opinion due to the comfort and it not being too expensive due to not requiring double prime.
You can also potentially squeeze an extra burst (17th burst) into a full 30 minute mincut fight assuming nothing delays you but realistically this doesn't really happen which I will explain further below.
Additionally if you use HEXA Rising Rage into HEXA Beam Blade it will both come off cooldown better with this potential if you use them in this order, this will result in a very slight boost to your dpm outside of your burst.Option 3: -4s CD + 1L STR - Most expensive (double prime potential) but insane confort and extra burst realistically possible:
You lose a massive chunk of STR and it costs a fortune to roll, but Worldreaver is basically always up with it having only a 19.5 second cooldown.
More importantly, it gives you a huge safety net for being able to use Sword Illusion very comfortably with it only having a 24.2 second cooldown.
Also with server lag being a thing for Instinctual Combo it can at times (very randomly of cource due to server lag sometimes lasting 2 seconds or even being able to go up to 10 seconds) allow you to use a second Sword Illusion before Instinctual Combo ends which is very beneficial for your damage output.
With future bosses and challenges coming out that basically make you run pretty much the full timer in order to clear them I would ultimately suggest you aiming for this potential option but only if you can affort going for it due to the 17th burst actually being realistically possible.
Additionally if you use HEXA Beam Blade into HEXA Rising Rage it will both come off cooldown perfectly with this potential if you use them in this order, this will result in a slight boost to your dpm outside of your burst.Side options (not further explained in this page due to being too unrealistic to obtain due to cost or not being good enough)
-3s CD or -3s + 1L STR or -2s + 1L STR - Not worth it:
Not worth it, you lose out on too much damage, only keep if you're insanely starved on meso and you want to make use of -cd for comfortability and you will eventually cube for one of the potentials I've mentioned above.
-5s CD or -6s CD - Omega expensive and insanely hard to get:
Same explanation as -4s CD + 1L STR, if you get this potential you use this for sure, higher chance to Sword Illusion twice while still having the Instinctual Combo buff due to server lag. This is a very good culvert hat to use pre-entry together with a 3L STR hat to cheese yourself to a very nice score, by the time you're done reading this whole page you understand why this is so good.
If you're a interactive player and you can obtain even higher -cd then go for that, the more the better as you can probably understand by now based on what I said with -5s and -6s, you can even potentially go up to -8s and -9s because you have access to bpots and with that you can even burst 18 times which is insane.
The Math:
Do you actually get an extra burst?
Let's look at a full 30-minute boss run, assuming a level 250 Merc legion block (-6% CD), your base 120s cooldown burst drops to 112.8 seconds (percentage reductions apply before flat hat cd reductions).If you pop your first burst at the start of the boss fight and hit every subsequent burst the second it's ready then here is how the end of the run looks:
| Hat potential | Burst cooldown | Theoretical possible bursts | Remaining time left on final burst (30 minute run) |
|---|---|---|---|
| 3L STR Hat | 112.8 seconds | 16 bursts | 1 minute and 48 seconds or less |
| -2s CD + 2L STR Hat | 110.8 seconds | 17 bursts | 27 seconds or less |
| -4s CD + 1L STR Hat | 108.8 seconds | 17 bursts | 59 seconds or less |
On paper, -2s and -4s both give you 17 bursts. But real boss fights aren't perfect test dummies.This is why the -2s hat is not realistic if your main goal is forcing that 17th burst:
You only have 27 seconds left on the clock when you start it. Since the Hero burst lasts 20 seconds, you literally only have an 7 second margin for error.
You're going to lose time when for example your burst is about to come off cooldown but Limbo disappears, hitting a specific %hp treshhold on the boss causing something to happen, when you're forced to dodge a specific mechanic or during long phase cutscene transitions resulting in you being unable to finish that 17th burst with a -2s hat.The -4s hat fixes this. It gives you a full minute of breathing room at the end, which easily eats those inevitable delays and guarantees you get the final burst off completely.
The Party Play Problem:
This is where CD hats can become a trap. Getting an extra burst is great for soloing, but in a party, you can end up griefing your party or yourself.Because endgame players generally run a Merc legion block, the standard party burst happens around the 113 second mark. If you're wearing a CD hat and try to bind and burst the boss early at ~111 or ~109 seconds depending on if you have -2 or -4 just to keep your own timer going, your party won't have their burst up yet and thus grief your party's damage massively.If you decide to just hold your burst and wait for the rest of the party to be ready, your CD hat is now completely useless and you're just missing out on the STR you would have had from a 3L hat.The best situation would of course be that your party also has a -2s or -4s hat so you can be more efficient but depending on the size of the party and the stage of progression they're at it is unlikely that they do.
If you do want to take advantage of the 17 bursts for mincutting a difficult endgame boss then you should suggest the party to also use a -4s hat.
Why you should just make multiple hats:
If you're maining Hero and you're doing the hardest bosses in the game, the smartest move is to just have two (or even three) separate hats, 3L STR and either -2s CD + 2L STR or -4s CD + 1L STR.This way, you don't have to compromise your solo damage, and you'll never accidentally mess up your party this way due to you for example binding too early because you see that your burst is up.This way you can cheese culvert the best way if you care about this, you use the cooldown hat pre-entry and you can then when inside swap to your 3L STR hat to have the most damage while also having semi-benefit from having more burst time at the start while still being able to burst at the end of the fight for full duration, this is expensive and annoying due to starforcing and laddering but will result in the best situation due to you being flexible in what you're able to do.
Changelog
June 17, 2026
- Updated link skill page.
- Updated several pages with a warning that the page will be worked on and are W.I.P.
- Fixed some typo's.
June 15, 2026
- Introduced the search bar at the bottom of the page!
- Added a smart-scroll button under the home button!
- Fixed some typo's that were reported and that I saw myself.
- Changed the 6th job page to already assume it's June 17 with the release of Sol Hecate.
- Link Skill, Crit Rate,Familiar Badges and Legion page changes will be coming probably at the end of June, let me enjoy CW3 for a bit lol.
April 27, 2026
- Updated 6th job page in preperation for Sol Hecate!
April 22, 2026
- Updated 6th job page!
- Updated Future Hero Changes page based on KMS ver. 1.2.414.
April 4, 2026
Massive overhaul on the site based on all announcements from KMS and skill changes that came to GMS and their interaction with AS10.
- Updated FAQ & Acronyms page.
- Updated Hat Potential page.
- Updated Weapon Type page.
- Updated Pet Skill Setup page.
- Updated Familiar Badges page.
- Updated Link Skills page.
- Updated Crit Rate page.
- Updated Important 1-4th Job Skills page.
- Updated 5th Page.
- Updated Future Hero Changes page.
March 12, 2026
- Updated OZ Ring page.
- Updated Future Hero Changes page.
- Added Hat Potential page, will be filled soonTM.
-Updated some pages to notify users an update for them is coming!
February 22, 2026
- Fixed loading on firefox mobile and safari.
- Fixed an issue where some images did not load, if you still experience this issue please let me know on Discord.
- Made all videos embedded and not load with loading the site, they are now all uploaded on youtube, this should make loading a lot faster for users with a slow internet connection!
February 12, 2026
- Updated link skills.
- Updated KMS(T) page.
October 5, 2025
- Minor site improvements & optimization.
- Updated pet skill UI screenshot and information to match.
- Updated link skill page. Updated mobbing link skill screenshot, recommendations, layout.
- Added clarification to Rending Edge and HEXA Stat.
- Added 0s culvert rotation to the skill sequence page.
September 26, 2025
- Updated link skill screenshot and added note to Sia skill for non-GMS players.
- Updated the "Skill Rotation for Bossing" and "Skill Sequence for Bossing" sections.
- Fixed typo on Hexa Stat 3 priority.
- Added Hexa-3 to 6th job upgrade order legend + list.
September 24, 2025
- Updated "Oz Ring" page for v263 update and adjustment of Oz ring cooldown from 180s -> 120s.
- Various updates to the "1-4th Job Skills" including Flash Blade and Enrage.
- Various updates to the "5th Job Skills" including Burning Soul Blade and Weapon Aura.
- Added information on HEXA Stat 3. Updated the general HEXA Stat section.
- Adjusted "6th Job" Rending Edge from max 4 hits to 32 hits.
August 21, 2025
- Added the "Other Resources" page to the site.
- Added an icon link to the "Other Resources" page in the site footer.
August 2, 2025
- Updated/modified wording and content under "1-H vs. 2-H" section on Weapon Type page.
- Updated/modified wording and content under "Terminus Defender Scrolling" section on Weapon Type page.
- Removed WIP notice on "Terminus Defender Scrolling" section on Weapon Type page.
August 1, 2025
- Creation of the "Changelog" page.
- Removed the HEXA Leveling Order notice on the 6th Job page.
- Updated 6th Job page w/ HEXA Leveling Order legend.
- Updated "Furious Edge" -> "Rending Edge" on 6th Job page.
- Removed "Furious Edge" from Acronym List.
- Added "Rending Edge" to Acronym List.
- Added "Terminus Defender Scrolling" section to the Weapon Type page w/ WIP notice.
- Added Interactive Server progression example for using 1-H and 2-H weapons.
- Minor site improvements (e.g. formatting, spelling, layout).
- Minor site optimization (e.g. elements)